
Connect Kahunas to Zapier
Zapier links Kahunas to other apps, such as a payment form, a CRM or a spreadsheet. There are two ways to use it:
- Kahunas sends to Zapier. An automation, such as Check-in form completed, posts to a Zapier webhook each time it runs. Your Zap then does the rest.
- Zapier creates clients in Kahunas. The Kahunas app in Zapier has one action, Create New Client. It adds a client to Kahunas when something happens in another app, for example a new sale.
Read video transcript
To send an automation to Zapier, open Automations and choose one. For the first step, choose Webhook. Paste the webhook URL from your Zap. It must start with https. Choose Save. The webhook posts each time the trigger fires. Find it later on the Zapier card, under Settings, then Integrations.
Before you start
- Sending to Zapier needs Automations. On seat plans it starts at the 25 to 49 seat tier. Team members also need the Automations permission. Only the business owner can open Integrations.
- Creating clients from Zapier is for coaches who joined from the original Kahunas. It needs the business owner's login and Zapier access: the Zapier / Make extension, or a seat plan at the 25 to 49 seat tier or above. A business that started on the new Kahunas can't sign in to the Kahunas app in Zapier. Use an automation webhook instead.
- You need a Zapier account. Zapier's webhook trigger, Webhooks by Zapier, is on Zapier's paid plans.
Send an automation to Zapier
A webhook step sends the automation's event to an address you give it. Zapier gives you that address.
- In Zapier, create a Zap. For the trigger, choose Webhooks by Zapier and the Catch Hook event. Copy the webhook URL Zapier shows you.
- In Kahunas, open Intake, then Automations, and choose the automation you want to send. For example, Check-in form completed runs when a client submits a check-in.
- Add the webhook as the first step:
- If the automation has no steps, choose the Webhook tile (To another app) under Add the first step.
- If it already has steps, choose Add step, then Webhook. You can also select the first step and choose Webhook under Change action type.
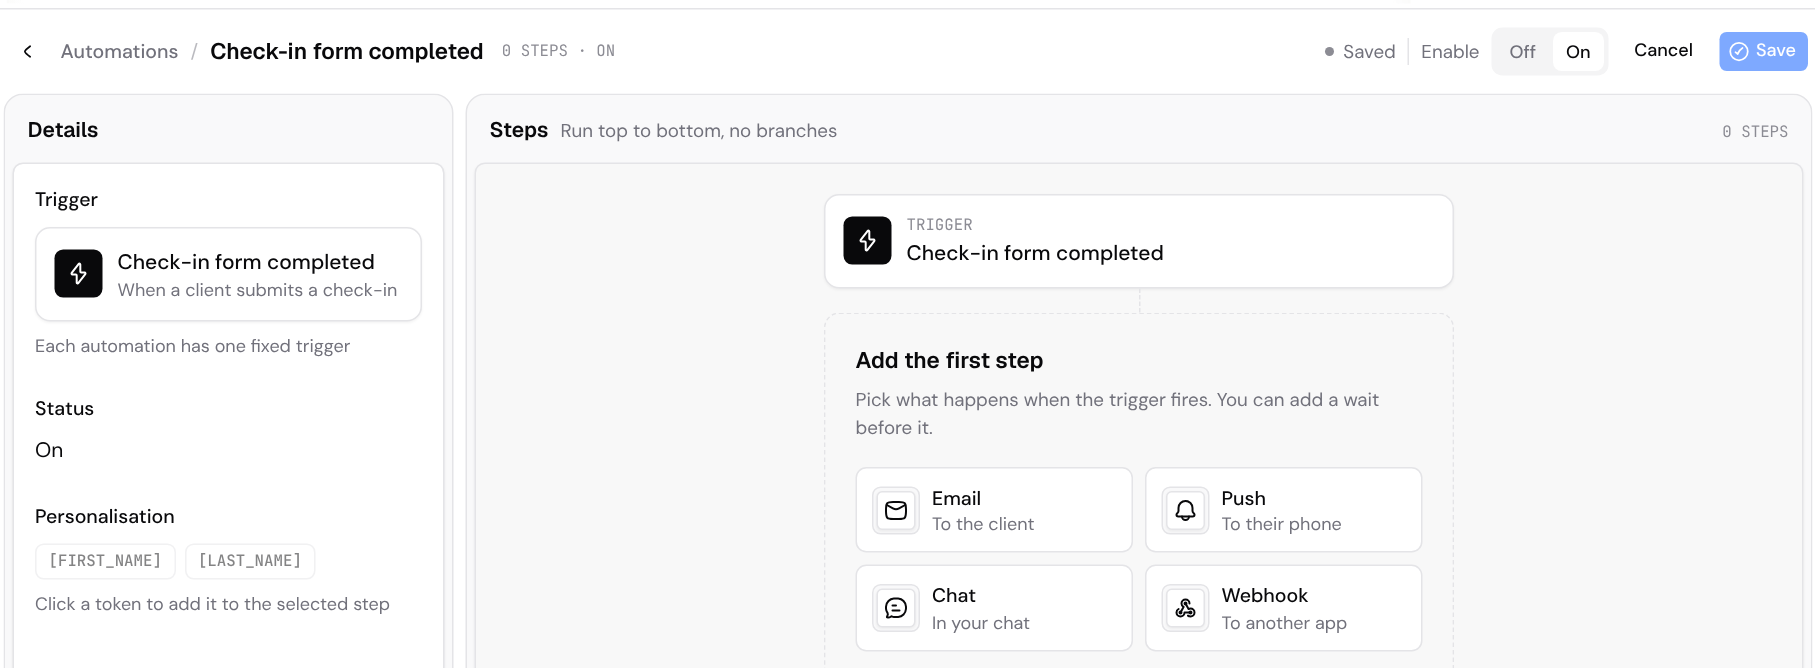
- The Webhook step sits straight under the trigger, with Wait set to No delay. It reads Posts when the trigger fires. Until you add an address, it shows Sends nothing.
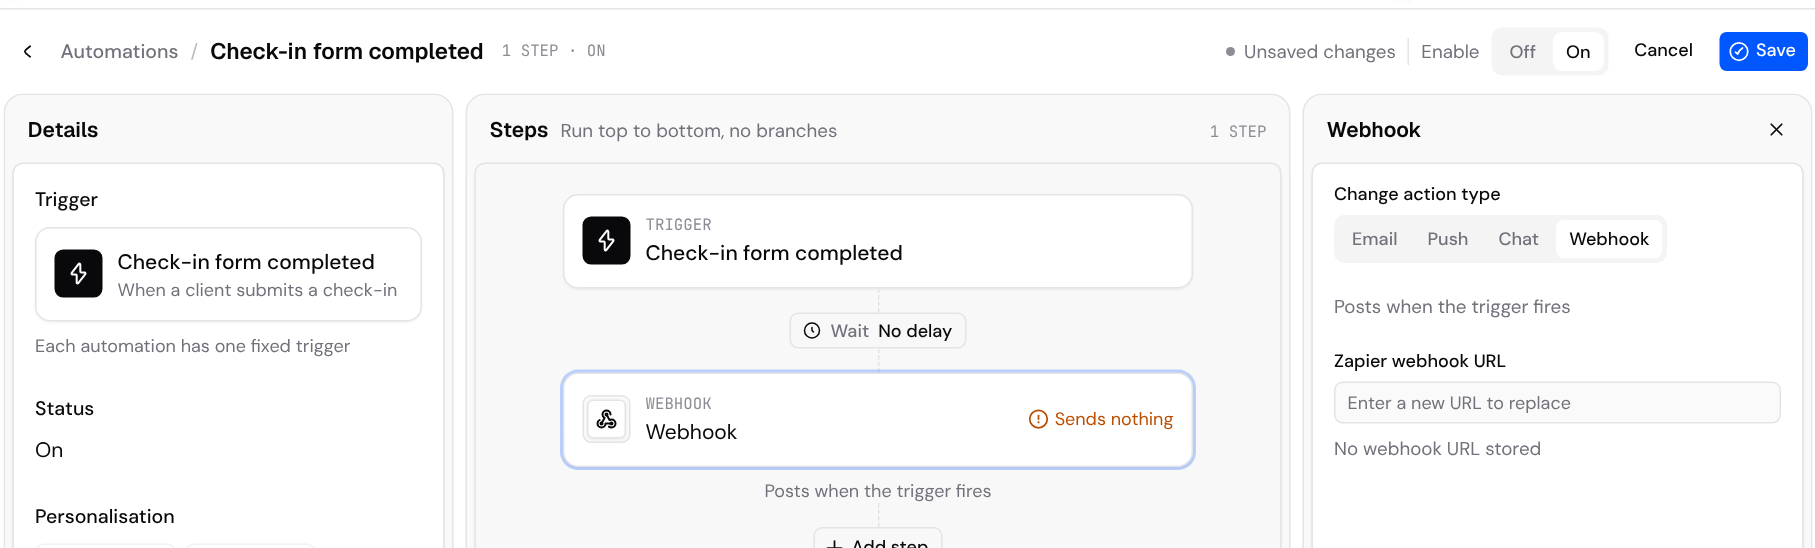
- Paste the address from Zapier into Zapier webhook URL. It must start with
https://. The step changes to Ready and shows the start and end of the address.
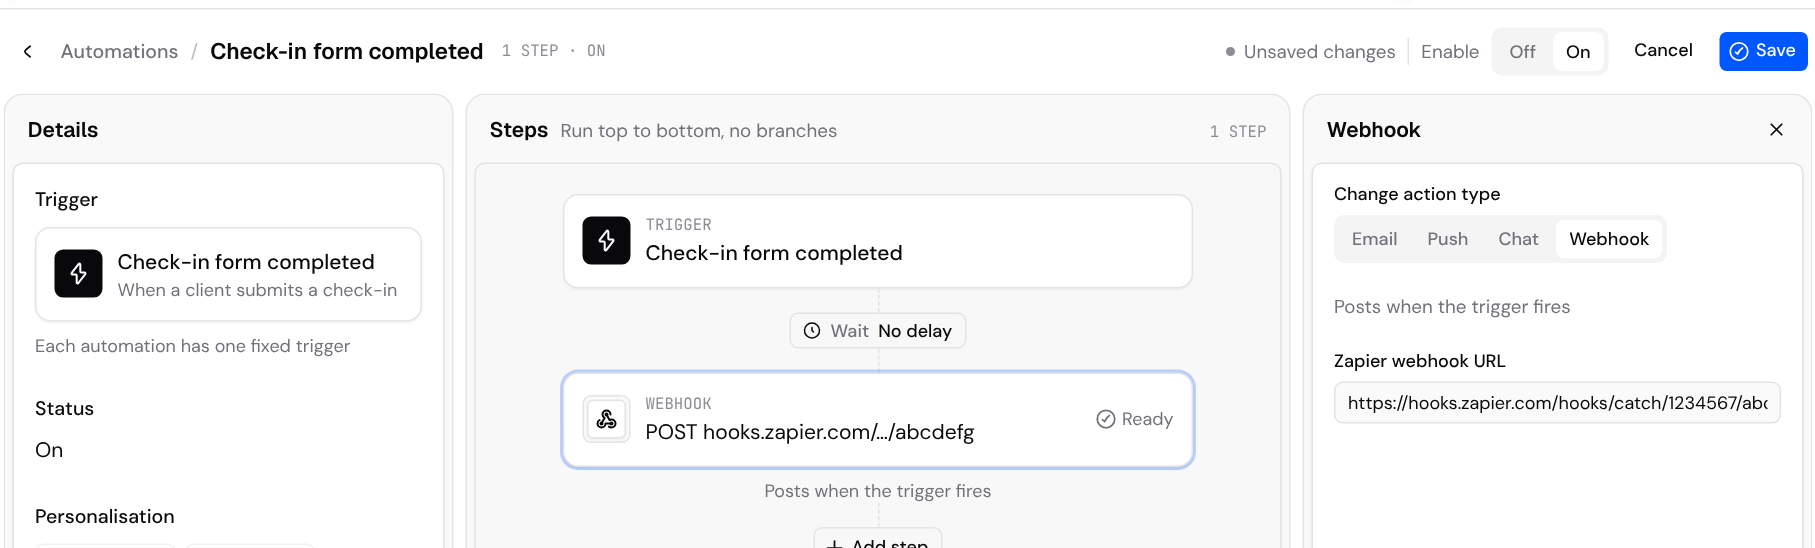
- Check that Enable is set to On if you want the automation to run, then choose Save. Once it's saved, the automation appears on the Zapier card in Settings → Integrations.
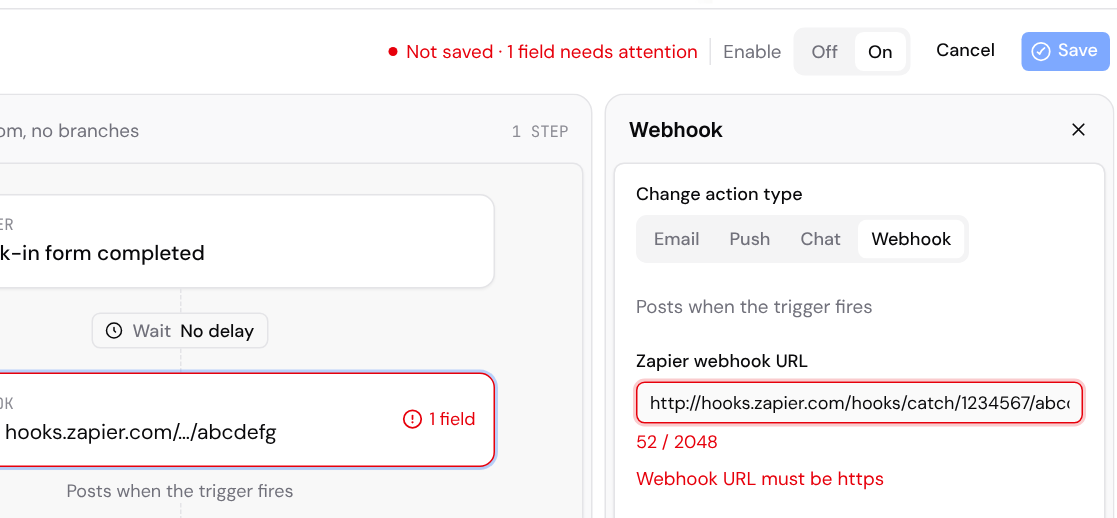
If the address starts with http://, the field turns red with Webhook URL must be https, and the top of the page reads Not saved · 1 field needs attention. Save stays unavailable until you fix it.
What happens next
- The webhook posts every time the trigger fires. For Check-in form completed, that's each time a client submits a check-in.
- Your messages still send. If the automation already had email, push or chat steps, they stay below the webhook and keep sending, each with its own wait. Adding a webhook doesn't replace them.
- Plan changes made in the phone app. If you assign or change a plan in the original Kahunas coach app on your phone, the plan automations still send their messages, but the webhook doesn't post. The webhook posts for changes you make on the web.
- Not every automation offers Webhook. An automation opened from a lead form offers an email step only.
To try it, select the webhook step and choose Send test. This makes a real request to the address, so your Zap may run. Send test only works while the full address is in Zapier webhook URL. After you save, Kahunas no longer shows the full address, so the field is empty when you come back. To test a saved webhook later, paste the full address from Zapier again, then choose Send test. See Check a test message in Setting up automations.
Change or remove the webhook
Once an address is saved, the field is empty and the note under it shows Current: with the address's domain and its last few characters, such as Current: hooks.zapier.com/… and four characters. To change it, paste a new address and choose Save. To stop sending to Zapier, choose Remove webhook, then Save.
If you joined from the original Kahunas and your old webhook address didn't start with https://, Kahunas couldn't keep it. The step asks you to enter the address again.
Find your Zapier automations
The business owner can see every automation that sends to Zapier in one place.
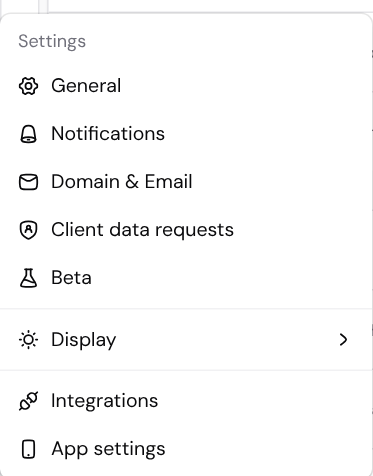
- Select Settings (the gear at the bottom of the left sidebar), then Integrations.
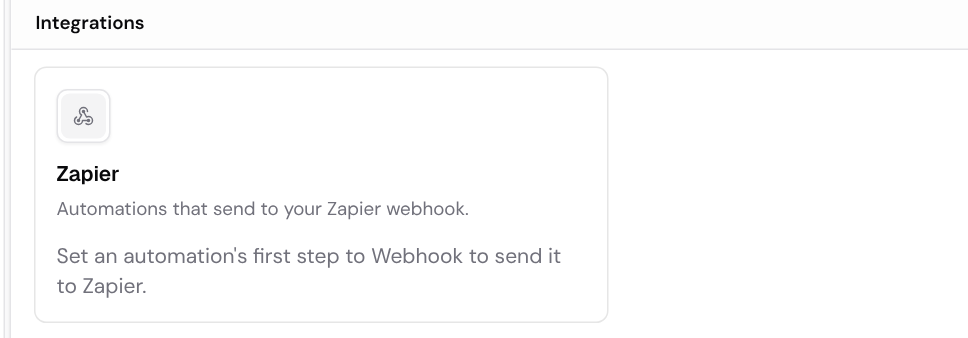
- Find the Zapier card under Integrations. It lists each automation that sends to your Zapier webhook. Select a name to open that automation.
When no automation sends to Zapier yet, the card reads Set an automation's first step to Webhook to send it to Zapier.
If the list can't load, the card reads We couldn't load your Zapier automations. Choose Try again. The rest of Integrations still works.
Create clients from Zapier
This part is for coaches who joined from the original Kahunas. The Kahunas app in Zapier has one action, Create New Client. It does the same as adding a client yourself in Kahunas.
Connect your Kahunas account
- In your Zap, add an action step, search for Kahunas and choose Create New Client.
- When Zapier asks you to connect Kahunas, sign in with the business owner's email and the password you use on the Kahunas web app. Team member logins can't connect.
Signing in to the Kahunas phone app later doesn't disconnect Zapier.
Fill in the client's details
In the Create New Client step, map each field to the matching value from your trigger app, or pick from the list. Zapier marks the required fields.
- First Name, Last Name and Email are required. Phone and Birthdate are optional.
- Package ID: required. Pick one of your active packages. Any default plans attached to the package are assigned too.
- Plan Start Date: required. Send it as a date, such as 2026-11-30. Zapier's date formatter can convert other formats.
- Payment start date: optional. Kahunas checks that it's a valid date but doesn't use it for the new client.
- Does this client need to pay?: required. Choose yes (true) if the client pays you outside Kahunas, for example by bank transfer. Kahunas records them as paying offline. It doesn't charge the client. Choose no (false) if the client doesn't pay.
- Check-in form ID: required. Pick one of your check-in forms.
- Check Frequency: required. Kahunas reads bi-weekly or fortnightly as every 2 weeks, four-weekly as every 4 weeks, and any other value as weekly.
- Check-In Days: required. One or more days, Monday to Sunday.
- Daily check-in form ID: required. Pick one of your daily habit forms.
- Initial Q&A ID: required. Pick one of your initial questionnaires.
- Can this client pay with Apple?: required by Zapier, so choose true or false. The new Kahunas doesn't use this answer, and it changes nothing for the client.
- Do you want this client to add a goal competition?: required. If you choose true, also fill in Goal Title and Goal Date.
The lists show only active packages and forms that aren't archived. If you don't use daily habits yet, set up a daily habit form first.
What happens when the Zap runs
- The client is added to People → Clients with the package and forms you chose.
- They get the same invitation email as a client you add yourself.
- Your New client created automation runs.
- The client counts toward your client or seat limit, like any other client.
A Zap run that Zapier marks as successful always means the client is in Kahunas.
Reconnect a Zap you made on the original Kahunas
Zapier connections made on the original Kahunas stop working once your business moves to the new Kahunas. Zapier shows the connection as expired, or the message Your Kahunas account has moved to the new Kahunas app. Reconnect your Kahunas account in Zapier to keep creating clients.
- Open the Zap and go to its Kahunas step.
- Choose Reconnect this account.
- Sign in with your Kahunas email and the password you use on the new Kahunas web app. Your old password no longer works.
Your Zaps keep working after you reconnect. The packages and forms you picked before still match, because Kahunas recognises them by their old IDs and by their names.
Common errors in Zapier
When Create New Client can't add the client, the Zap run fails and Zapier shows one of these messages.
| Message | What it means |
|---|---|
| Authentication failed or Unauthorized Access | The email or password is wrong, or the login isn't the business owner. |
| This account cannot create clients through Zapier. | The business started on the new Kahunas. Send an automation to Zapier instead. |
| You have to upgrade your account to use this feature. | The business doesn't have Zapier access. Add the Zapier / Make extension or move to a seat plan at the 25 to 49 seat tier or above. |
| Your Kahunas account has moved to the new Kahunas app. | Reconnect the Kahunas step. See Reconnect a Zap. |
| The email has already been taken. | A client with that email already exists. |
| The selected package plan id is invalid. | The package in the Zap was deleted or archived. Pick an active package in Package ID. |
| The selected check in form id is invalid., The selected habit form id is invalid. or The selected questionnaire form id is invalid. | That form was deleted or archived. Pick an active form in Check-in form ID, Daily check-in form ID or Initial Q&A ID. |
| The first name field is required. (or another field) | The Zap sent that field empty. Map it in the Create New Client step. |
| The plan start date is not a valid date. | Send the date as 2026-11-30, or as a full date and time. |
| You have reached your maximum client limit. | The business is at its client or seat limit. |
| The client was created, but their invitation email could not be sent. | The client is in Kahunas. Resend the invitation from the client's profile. Don't run the Zap again, because the email is now taken. |
| Kahunas is temporarily unavailable. Try again shortly. | Kahunas couldn't check your login or access just then. Try the run again in a few minutes. |
Related guides
Sharing content with clients
Add files, links and articles to your Library. Choose which packages can access them, set release timing, and keep resources up to date.
Remind clients to check in and follow up on missed check-ins
Set up the Check-in reminder and Missed check-in automations so clients get a nudge about their check-in and a kind follow-up if they miss it.